重要
本文概述了使用Flask和Flask-restplus创建REST API所需的步骤。这些工具组合成一个框架,Swagger被整合在Flask-restplus中。
- API参数校验
- 格式化输出(Json)
- 生成交互式API文档
- 将python异常转化为Readable http响应。
- API文档可导出
Swagger格式,也可以导出为Postman-collection
1.简介
Flask: 轻量级的Python Web框架。
Flask-RestPlus 使开发REST api变得快速和简单。它提供了足够的语法糖,使您的代码易于阅读和维护。它集成Swagger UI为API生成交互式文档。
2.环境准备
3. 运行Demo应用
下载示例代码
1
2
3
| cd ~/work_space/
git clone https://github.com/hex-go/restplus-api-demo.git
cd restplus-api-demo
|
构建运行的venv环境
1
2
3
| virtualenv -p `which python3` venv
source venv/bin/activate
(venv) $ pip install -r requirements.txt
|
初始化应用,并启动
1
2
| (venv) $ python setup.py develop
(venv) $ python rest_api_demo/app.py
|
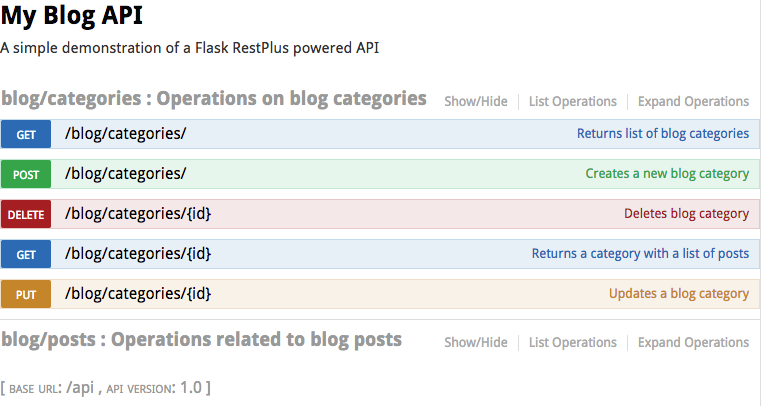
访问地址http://localhost:8888/api/,可以查看API文档如下:
4. 使用
4.1 HelloWorld举例
 1
 2
 3
 4
 5
 6
 7
 8
 9
10
11
12
13
| from flask import Flask
from flask_restplus import Resource, Api
app = Flask(__name__) # Create a Flask WSGI application
api = Api(app) # Create a Flask-RESTPlus API
@api.route('/hello') # Create a URL route to this resource
class HelloWorld(Resource): # Create a RESTful resource
def get(self): # Create GET endpoint
return {'hello': 'world'}
if __name__ == '__main__':
app.run(debug=True) # Start a development server
|
4.2应用目录结构规划
 1
 2
 3
 4
 5
 6
 7
 8
 9
10
11
12
13
14
| ├── api #
│ ├── blog # Blog-related API directory
│ │ ├── business.py #
│ │ ├── endpoints # API namespaces and REST methods
│ │ │ ├── categories.py #
│ │ │ └── posts.py #
│ │ ├── parsers.py # Argument parsers
│ │ └── serializers.py # Output serializers
│ └── restplus.py # API bootstrap file
├── app.py # Application bootstrap file
├── database #
│ └── models.py # Definition of SQLAlchemy models
├── db.sqlite #
└── settings.py # Global app settings
|
Rest API 定义放在文件rest_api_demo/api/restplus.py
Flask app 的配置和实例化放在文件rest_api_demo/app.py
重点注意的是app.py文件的initialize_app函数:
 1
 2
 3
 4
 5
 6
 7
 8
 9
10
| def initialize_app(flask_app):
configure_app(flask_app)
blueprint = Blueprint('api', __name__, url_prefix='/api')
api.init_app(blueprint)
api.add_namespace(blog_posts_namespace)
api.add_namespace(blog_categories_namespace)
flask_app.register_blueprint(blueprint)
db.init_app(flask_app)
|
Blueprint 注册/apiURL前缀的路由;这样就可以通过前缀区分不同部分或不同版本的api。add_namespace api本身也分为多个namespace, 每个ns都有自己的URL-prefix,在/api/blog/endpoints目录下配置。
4.3 定义 API
api=namespace+resource+method
rest_api_demo/api/blog/endpoints/categories.py
 1
 2
 3
 4
 5
 6
 7
 8
 9
10
11
12
13
14
15
16
17
18
19
20
21
22
23
24
25
26
27
28
29
30
31
32
33
34
35
36
| ns = api.namespace('blog/categories', description='Operations related to blog categories')
#
#
@ns.route('/') #
class CategoryCollection(Resource): #
#
def get(self): # 1. Retrieve a list of categories
"""Returns list of blog categories.""" # curl -X GET 'http://localhost:8888/api/blog/categories/'
return get_all_categories() #
#
@api.response(201, 'Category successfully created.') #
def post(self): # 2. Create a new category
"""Creates a new blog category.""" # POST 'http://localhost:8888/api/blog/categories/'
create_category(request.json) #
return None, 201 #
#
#
@ns.route('/<int:id>') #
@api.response(404, 'Category not found.') #
class CategoryItem(Resource): #
#
def get(self, id): # 3. Retrieve category with ID 1
"""Returns details of a category.""" # GET 'http://localhost:8888/api/blog/categories/1'
return get_category(id) #
#
@api.response(204, 'Category successfully updated.') #
def put(self, id): # 4. Update the category with ID 1
"""Updates a blog category.""" # PUT 'http://localhost:8888/api/blog/categories/1'
update_category(id, request.json) #
return None, 204 #
#
@api.response(204, 'Category successfully deleted.') #
def delete(self, id): # 5. Delete the category with ID 1
"""Deletes blog category.""" # DELETE 'http://localhost:8888/api/blog/categories/1'
delete_category(id) #
return None, 204 #
|
api.namespace() 创建某个URL-prefix的namespace, 其中description的内容会在api文档中。@ns.route() 将URLs与函数绑定,可以指定路径参数。比如@ns.route('/<int:id>')。string:(default),path:,int:,float:,uuid:- 每个
Resource 都是一个类,类包含的方法与http-method对应。包括:get, post, put, delete, patch, options, head. @api.response 声明每个方法的返回状态码+信息
上面代码生成的api文档页面如下图:
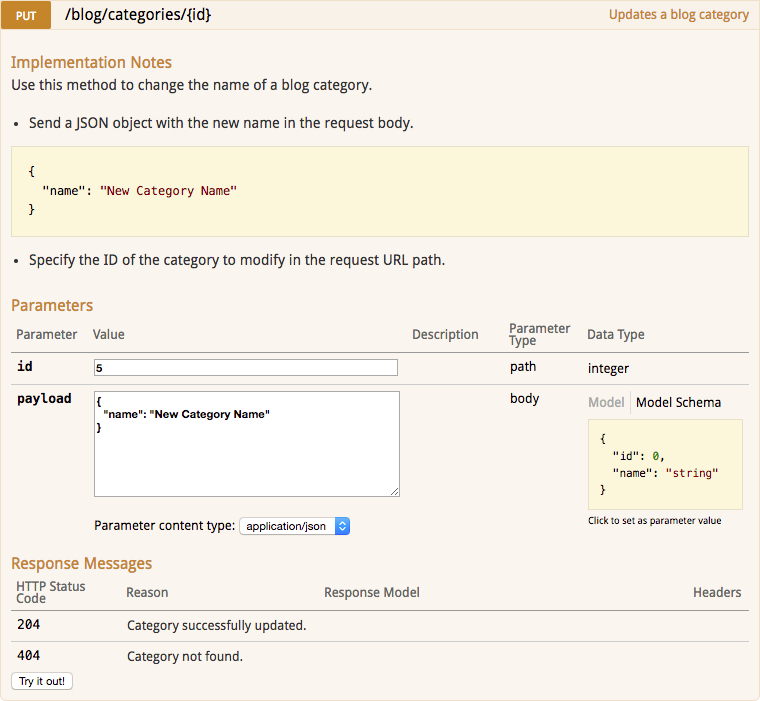
Swagger UI文档还包括一个可以设置参数的表单。如果需要一个请求体,它的格式可以指定。 点击Try it out!按钮,将会给后端服务发请求,并显示response信息。
4.4 参数+method校验
上面提到了在path中用<>传参,下面介绍:
- request请求中传参(?xx=xxx)
- headers中传参(–heads HOST=xxx)
- form表单中(in request body)
所以需要用到RequestParser对象,可以通过函数add_argument()来声明参数以及参数的类型。
4.4.1 通用配置
rest_api_demo/api/blog/parsers.py
1
2
3
4
5
6
| from flask_restplus import reqparse
pagination_arguments = reqparse.RequestParser()
pagination_arguments.add_argument('page', type=int, required=False)
pagination_arguments.add_argument('per_page', type=int, required=False,
choices=[5, 10, 20, 30, 40, 50], default=10)
|
然后通过装饰器@api.expect,将这个parser与方法绑定。
rest_api_demo/api/blog/endpoints/posts.py
1
2
3
4
5
6
| @ns.route('/')
class PostsCollection(Resource):
@api.expect(pagination_arguments, validate=True)
def get(self):
...
|
配置了参数校验后,Swagger-UI会显示一个form表单来校验参数。
- 参数校验可以通过
@api.expect的参数validate来启用或关闭。(分别在每个方法上做设置) - 全局启用/关闭
app.config['RESTPLUS_VALIDATE'] = True。(在开发时,debug使用)
type allowed value: int,str,bool.
location 声明参数在哪儿, allowed value: headers, form, json…
1
2
3
| parser.add_argument('args1', location='headers')
parser.add_argument('args2', location='form')
parser.add_argument('args2', location='json')
|
action 多值参数
1
| parser.add_argument('args1', type=int, action='append', required=True)
|
choise 可选值
1
| pagination_arguments.add_argument('pages', choices=[5, 10, 20, 30, 40, 50])
|
4.5 json对象的值校验和说明
4.5.1 通用配置
通过api.model()列出所有期望的字段来定义对象的格式。每个字段都有一个关联的类型(e.g. String, Integer, DateTime)
rest_api_demo/api/blog/serializers.py
 1
 2
 3
 4
 5
 6
 7
 8
 9
10
| from flask_restplus import fields
from rest_api_demo.api.restplus import api
blog_post = api.model('Blog post', {
'id': fields.Integer(description='The unique identifier of a blog post'),
'title': fields.String(required=True, description='Article title'),
'body': fields.String(required=True, description='Article content'),
'status': fields.String(required=True, enum=['DRAFT', 'PUBLISHED', 'DELETED']),
'pub_date': fields.DateTime,
})
|
将定义的校验model绑定给指定的Resource, 通过@api.expect(blog_post)
1
2
3
4
5
6
7
| @ns.route('/')
class BlogPostCollection(Resource):
@api.response(201, 'Blog post successfully created.')
@api.expect(blog_post)
def post(self):
...
|
公共参数选项:
required: True/False是否必填项;default: 该字段的默认值;description: 该字段说明(会在SwaggerUI中显示);example: 字段值示例(会在SwaggerUI中显示);
更具体的校验参数选项
字符串类型(包括String):
min_length 和 max_length: 字符串最大或最小长度。
pattern: 正则表达式。
举例(字符串长度5<=len<=200, 必填, 正则: 小写字母+数字+符号’-’):
1
| 'slug': fields.String(required=True, pattern='^[a-z0-9-]+$', min_length=5, max_length=200)
|
数字类型(包括Integer,Float,Fixed,Arbitrary):
min 和 max: 该字段最大值或最小值, 包括边界值, 即 min<value<max;exclusiveMin and exclusiveMax: 该字段最大值或最小值, 但不包过边界值, 即 exclusiveMin<value<exclusiveMax;multiple: 该字段必须是多值;
嵌套类型配置
API-model的一个字段可以使用另一个API-model作为它的期望值。然后提供一个JSON对象作为该字段的有效值。
1
| 'details': fields.Nested(blog_post_details)
|
API-model的一个字段是一个值列表,甚至是一个嵌套对象列表。
1
2
| 'item_ids': fields.List(fields.Integer),
'items': fields.List(fields.Nested(blog_post))
|
Model继承
相似的API-model可以使用继承来扩展带有其他字段的API-model的定义。在下面的示例中,父类:通用分页API模型pagination,子类:更具体的博客文章分页page_of_blog_posts。使用api.inherit()方法继承父类。
 1
 2
 3
 4
 5
 6
 7
 8
 9
10
| pagination = api.model('A page of results', {
'page': fields.Integer(description='Number of this page of results'),
'pages': fields.Integer(description='Total number of pages of results'),
'per_page': fields.Integer(description='Number of items per page of results'),
'total': fields.Integer(description='Total number of results'),
})
page_of_blog_posts = api.inherit('Page of blog posts', pagination, {
'items': fields.List(fields.Nested(blog_post))
})
|
4.6 处理输出json对象
可以根据上文提的 API-model定义,通过方法@api.marshal_with(model)将生成一个与model定义相同的json对象返回。值对应可以是两种方式:
- 被装饰函数返回一个
object,object具有跟model中字段名相同的属性; - 被装饰函数返回一个
dict,dict具有跟model中字段名相同的key;
例如,方法返回与API-model具有相同字段的SQLAlchemy ORM对象。
rest_api_demo/api/blog/endpoints/categories.py
 1
 2
 3
 4
 5
 6
 7
 8
 9
10
| @ns.route('/<int:id>')
@api.response(404, 'Category not found.')
class CategoryItem(Resource):
@api.marshal_with(category_with_posts)
def get(self, id):
"""
Returns a category with a list of posts.
"""
return Category.query.filter(Category.id == id).one()
|
如果返回值是list, 使用装饰器@api.marshal_list_with(model).
attribute: 显式声明值来自于函数返回对象的哪个字段;
1
| 'firstName': fields.String(attribute='first_name'),
|
通过attribute参数,可以提取嵌套在对象结构深处的值:
1
| 'firstName': fields.String(attribute='user.first_name'),
|
更复杂的情形, 使用lambda函数提取值:
1
| 'fullName': fields.String(attribute=lambda x: '{} {}'.format(x.first_name, x.last_name)),
|
4.7 处理Errors
通过函数api.abort()抛出异常
1
| api.abort(code=400, message="Sorry, Dave. I'm afraid I can't do that.")
|
如果没有显式地自己处理错误,Flask将捕获异常并将其转换为一个HTTP 500错误页面。
通过装饰器@api.errorhandler重写默认的错误处理函数
rest_api_demo/api/restplus.py
1
2
3
4
| @api.errorhandler(NoResultFound)
def database_not_found_error_handler(e):
log.warning(traceback.format_exc())
return {'message': 'A database result was required but none was found.'}, 404
|
Flask debug模式下,上面default_error_handler不会生效。异常只会触发Werkzeug interactive debugger页面。
4.8 重置数据库
如果删除数据库db.sqlite文件或只是想将数据库重置为空状态,可以在Python控制台中输入以下命令。
1
2
3
4
5
6
| >>> from rest_api_demo.app import initialize_app, app
>>> from rest_api_demo.database import reset_database
>>>
>>> initialize_app(app)
>>> with app.app_context():
... reset_database()
|
Reference
Rest API Design Rulebook
flask-restplus stable文档
api export to Postman
api export to PostMan